WinDetect is totally free.
WinDetect User Guide
![]()
WinDetect is an antivirus and anti-malware program that searches Windows PCs for malicious files. WinDetect detects viruses, root kits, keyloggers, trojans, spyware, downloaders, and other kinds of malware by examining selected executable files and registry keys in Windows installations. WinDetect can also disable many of the files it finds. WinDetect completes scans of your PC quickly and can be used along with other antivirus programs.
WinDetect is recommended for advanced computer users who can recognize malicious, unwanted applications or are willing to do additional research to determine if files are malicious.
You should be cautious when disabling suspicious files with WinDetect. You can only restore disabled files if you created a Windows restore point before disabling them. See Create a Windows system restore point below.
Index
Using WinDetect—I. Installing and Starting WinDetect
Using WinDetect—II. User Interface
Using WinDetect—III. Recommendations
![]()
Overview
top
WinDetect finds suspicious files on your Windows PC, but it lets you decide what to do with them. WinDetect can disable many of those files if you determine they are dangerous.
WinDetect is safe to use
WinDetect is safe to use on your computer. Every WinDetect installation file is digitally signed with a code certificate issued by Comodo Group. The certificate verifies the source, authenticity, and integrity of the software. If you attempt to run a software file and a certificate is not present, Windows displays a security warning stating the publisher could not be verified.
What WinDetect does
WinDetect examines selected files and registry keys in Microsoft Windows installations. It flags files that fail to pass any of multiple heuristic tests designed to detect malicious applications. When WinDetect finishes running, it displays a list of suspicious files. By selecting any file in the list, you can see why the file was flagged and whether WinDetect can disable it. If you decide to disable a file, only a few additional steps are required.
WinDetect creates a log of the files it examines. You can upload the log to HeavenWard, where it is quickly evaluated using additional heuristic tests and checked against multiple, up-to-date malware data bases. Those tests may detect additional dangerous files. The report provides additional information about all suspicious files found on your system and will help you make decisions about disabling them. You can also access information about specific files using links in WinDetect as described later below.
What WinDetect does not do
WinDetect takes no action to disable files unless you instruct it to do so. In addition, when WinDetect disables a file, it does not modify or delete it. Instead, WinDetect terminates the file if it is running and then effectively uninstalls it by modifying the registry keys that cause it to run.
![]()
Technical
Facts
top
WinDetect searches selected Windows directories and registry keys and then uses multiple sets of rules to flag suspicious files. Executables currently in memory are also examined. A WinDetect search and evaluation is relatively fast, since it uses a smart search protocol and does not rely on virus data-base information.
Files and registry keys tested by WinDetect
WinDetect selectively tests certain executable files (and disguised executable files). WinDetect also evaluates executables currently in memory and searches the Windows registry for registry keys related to executables.
How WinDetect evaluates files
WinDetect uses multiple sets of rules to evaluate and flag Windows files. This heuristic approach is selective, fast, and can be used with other threat detection methods. The rules check many file and registry-key properties, including these:
file location and name
class of file: executable, service, driver, module, etc.
how and when the file starts
other files the file starts
whether and how the file establishes internet connections
the file’s visibility in Windows Explorer and Task Manager
the file’s use of APIs (Application Programming Interfaces) to link to other executables or to databases
the file’s digital signatures and identity as a trusted Windows file
characteristic properties of rootkits.
How files are evaluated online
WinDetect creates a compressed version of the file and registry information it gathers from your computer. When you upload the compressed log to HeavenWard, additional heuristic tests are performed on its contents. The files in the log are also tested against up-to-date information from multiple malware databases. Thus, the online evaluation may spot suspicious files that the WinDetect application did not identify.
Results of the online evaluation are sent to your browser within seconds after WinDetect uploads the log to HeavenWard. The report provides additional information about all suspicious files, including their risk levels, locations, actions, and specific characteristics. Each file description links to a page with more detail and links to reports from other malware detection services. The page is optimized to help you search for information online about any file.
Information identifying your computer is removed from the log before it is analyzed.
![]()
Using
WinDetect—I. Installing and Starting WinDetect
top
WinDetect installs easily.
Download and run the WinDetect set up file, windetectsetup.exe. WinDetect will install in C:\Program Files\HeavenWard\WinDetect.
Start WinDetect by clicking start > Programs > HeavenWard > WinDetect. You can also double click windetect.exe in the program folder.
![]()
Using
WinDetect—II. User Interface
top
These are the WinDetect menu bar commands:
![]() Search/search again:
runs a WinDetect search and can be used at any time.
Search/search again:
runs a WinDetect search and can be used at any time.
![]() View suspicious
files: displays the list of suspicious files, called the
Technical Summary.
View suspicious
files: displays the list of suspicious files, called the
Technical Summary.
![]() Disable: disables
the file(s) selected in the list of suspicious files.
Disable: disables
the file(s) selected in the list of suspicious files.
![]() View disabled files:
displays a list of successfully disabled files, called Removed
Items.
View disabled files:
displays a list of successfully disabled files, called Removed
Items.
![]() Upload - currently
disabled: uploads individual files to HeavenWard for manual
analysis. This feature will be available in future versions of
WinDetect.
Upload - currently
disabled: uploads individual files to HeavenWard for manual
analysis. This feature will be available in future versions of
WinDetect.
![]() Help:
Displays About WinDetect information and a link to WinDetect’s
online user guide.
Help:
Displays About WinDetect information and a link to WinDetect’s
online user guide.
The WinDetect user interface has two main panels:
The
left panel, or List Panel, displays either of two lists, the
list of suspicious files most recently flagged, called the Technical
Summary, or the Removed Items label indicating that the
right panel contains information about removed files. The
right panel, or Information Panel, displays several kinds of
content, including information about files selected in the left
panel, a link (Find) to additional file information hosted by
HeavenWard online, or dialogs for uploading WinDetect’s log or
individual files to HeavenWard for evaluation. The
red and yellow icons presented in WinDetect and in HeavenWard’s
online reports rate each file’s risk: Every
file shown in the List panel has either of two check boxes:
file can be disabled
by WinDetect
file
cannot be disabled by WinDetect
![]() high risk
high risk
![]() moderate risk
moderate risk
When
Simple mode is selected, WinDetect flags fewer files, but they
are likely to include truly malicious files found on your
installation. When Expert mode is selected, additional files
are flagged. However, many of the additional files are likely to be
safe and should not be disabled.
Using
WinDetect—III. Recommendations Once
a file is disabled by WinDetect, it cannot be restored unless a
Windows restore point was created before disabling the file.
Beginners should get all available information about suspicious files
before disabling them. Also, it is wise to run WinDetect again after
disabling files since some malware is highly resistant to
modification and may continue to run. When
using WinDetect, this procedure is recommended: Start
WinDetect. Select
Simple mode or Expert mode. Run
a WinDetect search. Carefully
evaluate suspicious files flagged by WinDetect to determine which
should be disabled. If
you are unsure whether a file is malicious or safe, create a Windows
restore point before disabling it. Disable
the files you believe are malicious. Confirm
that the files have been disabled. Reboot
your computer and run a WinDetect search again to make certain
malicious files have been successfully disabled.
Here are instructions in
detail: Start
WinDetect. Start WinDetect by clicking start >
Programs > HeavenWard > WinDetect.
You can also double click windetect.exe in the WinDetect
program folder located in the HeavenWard program folder. Select
Simple mode or Expert mode.
When
Simple mode is selected, WinDetect flags fewer files, but
those usually include truly malicious files found on your system.
When Expert mode is selected, additional files are flagged,
but they tend to be safe, and most should not be disabled. Run
a WinDetect search. To run a WinDetect search, click Scan.
Evaluate
suspicious files. After WinDetect completes its search, follow
these steps to evaluate flagged files:
When
WinDetect completes its search, a list of suspicious files found on
your computer, the Technical Summary, opens in the List
Panel. To view information about any suspicious file, select it
in the List Panel and look in the Information Panel. Find
additional information about a specific file by selecting it in the
List Panel and clicking Find in the Information
Panel. HeavenWard’s resource page for the file opens in your
browser. The page is optimized to help you search for additional
information about the file online. (Highly
recommended) Conduct additional heuristic tests and additional
checks against multiple data bases by uploading the information in
WinDetect’s log file to HeavenWard.
To upload WinDetect‘s
log, Click
(Currently
disabled) Future versions of WinDetect will allow you to upload
individual suspicious files to HeavenWard for manual analysis.
Click
Create a Windows
system restore point. If you decide to disable a file or files,
consider creating a system restore point first. If you decide to
restore the file(s) later, you can only do so by restoring your
system to a restore point created before the file(s) were disabled.
You can find instructions for creating and using Windows system
restore points online:
http://support.microsoft.com/kb/948247
(Windows XP)
http://windows.microsoft.com/en-us/windows7/products/features/system-restore
http://www.eightforums.com/tutorials/4690-restore-point-create-windows-8-a.html
(Windows 8)
Disable
the files you decide are malicious. Click
Select the check box(es)
for the file(s) you want to disable. Then click
Confirm
that the files have been disabled. After WinDetect attempts to
disable a file, the Removed Items list opens in the
Information Panel. Items in green and labeled ok are
successfully disabled. Items in red and labeled failed are
not disabled. To access information online about the files and
registry keys shown in the Information Panel, click View
Details.
Reboot
and search again. Some malicious files are designed to be
difficult to deactivate. Therefore, after disabling files it is
always wise to reboot your computer, run a WinDetect search again,
and recheck the status of the file(s) you disabled. The status of
file(s) you attempted to disable is shown under ∑ Technical
Summary in the List Panel, where disabled files are
marked with a black X.
Troubleshooting
WinDetect If
you have questions about running WinDetect not answered here, you may
submit them to HeavenWard Support at support@hwsuite.com.
Resources These
online resources let you search multiple data bases for information
about potentially malicious files: RemoveAny
Virus Base, http://virusbase.free-anti-spy.com/en/index.php.
Browse information on known suspicious files or search for additional
information using file names or checksums. The file checksums shown
are MD5 hashes. virustotal,
https://www.virustotal.com/#search.
Use the MD5 file hashes from HeavenWard’s online reports to search
multiple malware data bases.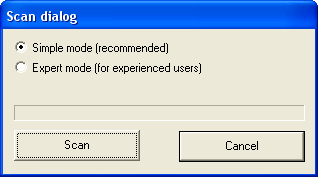
![]()
top
![]() to view the Technical Summary. Then select
to view the Technical Summary. Then select
∑
Technical Summary in the List Panel
and follow the instructions shown in the Information Panel for
uploading the compressed (.gz) file containing the log. Soon after
the file is uploaded, results of HeavenWard’s analysis open in your
default web browser.![]() and follow the instructions shown in the Information Panel.
The manual analysis is completed as time allows. Results are emailed
to you.
and follow the instructions shown in the Information Panel.
The manual analysis is completed as time allows. Results are emailed
to you.
(Windows 7)
![]() to view the suspicious files found on your computer (the Technical
Summary) in the List Panel if they are not already
displayed. WinDetect can disable files with a black check box
but not ones with a gray check box .
You can also look in the Information Panel to see if any file
selected in the List Panel can be disabled by checking its
Removal Status.
to view the suspicious files found on your computer (the Technical
Summary) in the List Panel if they are not already
displayed. WinDetect can disable files with a black check box
but not ones with a gray check box .
You can also look in the Information Panel to see if any file
selected in the List Panel can be disabled by checking its
Removal Status.![]() . The Remove items dialog opens. Read the notice in the
dialog. Then click Yes to disable the file(s).
. The Remove items dialog opens. Read the notice in the
dialog. Then click Yes to disable the file(s).
![]()
top![]()
top